Rejuvulite  /  Support  /  Getting Started

Getting Started with Rejuv

Everything you need for your first session — from waking the device to retrieving your session record via NFC.

Quick Reference
A printable two-page guide covering setup, session flow, NFC retrieval, and calibration.
Download PDF →
1
Waking the device

The Rejuv enters sleep mode automatically after 20 seconds without use. This is normal behavior — not a fault or power issue. Press the button once to wake it.

The device will also shut off automatically when a session completes. If the unit appears unresponsive, a single button press will wake it.
Press once Wake from sleep — indicator LED activates
Sleep timeout
The unit sleeps after 20 seconds of inactivity to preserve battery. It will not start a session while asleep — wake it first, then press to start.
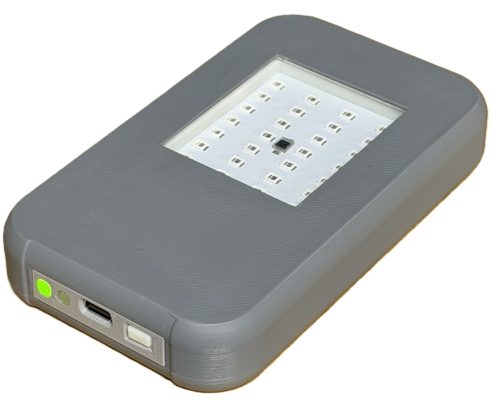
Rejuv device — front face showing LED aperture and button
2
Selecting a mode

Hold the button for 2 seconds to cycle through operating modes. An audible tone confirms each change. Release and hold again to continue cycling.

660 nm
Red
~5 min
805 nm
NIR
~6 min
660 + 805 nm
Both
~3 min
→ repeats

Session times shown are typical for a 10 J/cm² target. Your unit calculates the precise session time from its own calibration — these figures are for reference.

~5 min
Red · 660 nm
36 mW/cm²
~6 min
NIR · 805 nm
28 mW/cm²
~3 min
Both channels
55 mW/cm²

Dose target, maximum irradiance per channel, speaker volume, and chime behavior are all configurable from the companion app.

Default mode
Units ship pre-configured to Red (660 nm) at a 10 J/cm² target. Change mode before starting your session if needed.
App configuration
Mode can also be set from the companion app before a session. App settings persist to the device via NFC write.
3
Starting and running a session

Press the button once to start a session. The device runs until the configured dose target is reached, then shuts off automatically. No manual timing required.

Press < 2s Start session — runs to configured dose target in J/cm², then stops
Hold 2s Cycle mode — red → NIR → both → repeats. Audible tone on each change.

Session data — mode, output state, duration, contact quality, and dose delivered — is recorded throughout the session and stored on the device for NFC retrieval.

Solid LED = good contact
The indicator LED shows contact status during the session. Solid means the device is on target. A breathing pattern indicates contact has fallen below the session baseline.
Dose target
The default target is 10 J/cm². This can be adjusted in the companion app. Your unit calculates session time from its own calibrated irradiance and adjusts output in real time to hit the target.
Session stops automatically
When the dose target is reached the device shuts off. This is expected — not a fault. The session record is stored and ready for NFC retrieval.
4
Contact baseline — LED flash on session start

When a session starts, the indicator LED will flash rapidly for approximately 3 seconds. This is normal and expected — the device is measuring your contact position and establishing a reference point for that session.

Once the baseline is established, the LED goes solid and session monitoring begins. All deviation alerts during the session are relative to this baseline, not an absolute threshold.

Rapid flash — what it means
The device is sampling the optical return from your contact surface to set a session-specific baseline. Hold the device steady against the treatment area during this period.
Position deviation chime
If contact or position shifts significantly during the session, an audible chime alerts you immediately. Correct your position and continue — the session will resume normal monitoring. The DOR chart in the app shows exactly when and how much deviation occurred.
Press button — session begins, LED starts rapid flash
~3 seconds — contact baseline being established. Hold steady.
LED goes solid — baseline set, active monitoring begins
Session runs — dose integration active. Chime if deviation detected.
Target reached — device shuts off, session record stored
5
Retrieving your session record via NFC

After a session, open the Rejuv app and press the ‘Tap · Hold phone to Rejuv’ button. Hold the back of your phone to the front face of the device to retrieve the session record. A brief haptic confirms the read. The app opens to a summary showing dose delivered, duration, and contact quality. No account or background connectivity required.

If ‘Read Fails’ or other errors occur, lift the phone and try again. If you consistently cannot read, start a new session on the Rejuv for a few seconds to clear the memory.

NFC alignment diagram — align iPhone NFC chip on back of phone with Rejuv NFC antenna surrounding LED aperture
Align the iPhone NFC chip (back of phone, near top) with the Rejuv NFC antenna surrounding the LED aperture
1
Open the Rejuv app and press the ‘Tap · Hold phone to Rejuv’ button
2
Hold the back of your phone toward the front face of the device
3
Center the top portion of your phone over the LED aperture — the NFC chip on iPhone is near the top of the phone on the back
4
Hold steady for 1–2 seconds — a brief haptic confirms a successful read
5
If ‘Read Fails’ or other errors occur, lift the phone and try again. If you consistently cannot read, start a new session on the Rejuv for a few seconds to clear the memory.
If the read doesn’t register
The NFC read zone is precise. Shift the phone slightly so the top portion is centered directly over the LED aperture and hold steady. If ‘Read Fails’ or other errors persist, lift the phone and try again. If you consistently cannot read, start a new session on the Rejuv for a few seconds to clear the memory.
NFC retrieval in practice — phone held with top edge against Rejuv LED aperture, app showing Read complete
Phone held with NFC chip aligned to LED aperture · “Read complete” confirmation visible in app
6
Charging

The Rejuv supports two charging methods — Qi wireless and USB-C. Either works; use whichever is more convenient.

Qi wireless — back face
Place the device face-down on any standard Qi wireless charger. The Qi receiver is on the back of the device — the flat face without the LEDs. Center the device on the charging pad.
USB-C
The USB-C port is located on the bottom edge of the back face. Connect any standard USB-C cable to charge.
Note on front vs. back
The front face (LEDs) is for treatment and NFC retrieval. The back face is for charging. The two functions are on opposite sides — place the correct face toward the charger.
Rejuv device back face placed on Qi wireless charger — charging pad centered on back surface
Back face down on Qi wireless charger · USB-C port visible at bottom edge